
IN 1995, MY FAMILY DISCOVERED the Thunderbird Trading Post, a 1945 structure standing alone on the crest of the Continental Divide in Pie Town. Earlier, on a quest to see the Very Large Array, we had spied a sign for Pie Town and agreed to go there afterward. For pie! But when we got there, we found the trading post all but defunct. Only weeds prospered. A sign on the door read for sale.
Seeing lights through the screen door, we ventured inside. An elderly couple watched us as we rummaged through dusty, yellowed postcards. My curious mother asked why there was no pie. With a reply as dry as his personality, the old man stated, “Too much work.”
We bought a few mementos and drove back to our base camp. My mother, Mary Knapp, had baked many a pie in my grandmother’s café, in Illinois. I heard her mutter, to no one in particular, “If that were my pie shop … ”
We got home to Dallas but couldn’t forget that sad place with no pie. My then husband, Thomas Hripko, a talented writer and musician, wrote a bluesy ballad about Pie Town’s plight, “No More Pie in Pie Town.” One day, he broached the subject of buying the building. We called my mother, in California, and she jumped at the opportunity to put the pie back in Pie Town. There was just one problem: money.
Dallas bankers were soon ushering us out of their glitzy high-rise offices, trying not to laugh. In their defense, it was hard to find a map that showed Pie Town really existed. Finally, a third-generation banker from Socorro, 83 miles east of Pie Town, got it. He remembered going to Pie Town—for pie—when he was a child. We got the loan.
Thomas and I made many trips to New Mexico from Dallas to help Mom. My daughter, Wendi Rae, happily gave up a gap year in Chicago to work on the café. After a few rounds of proposing quirky names for the business, we decided on one that described what we were: modern-day Pie-O-Neers.

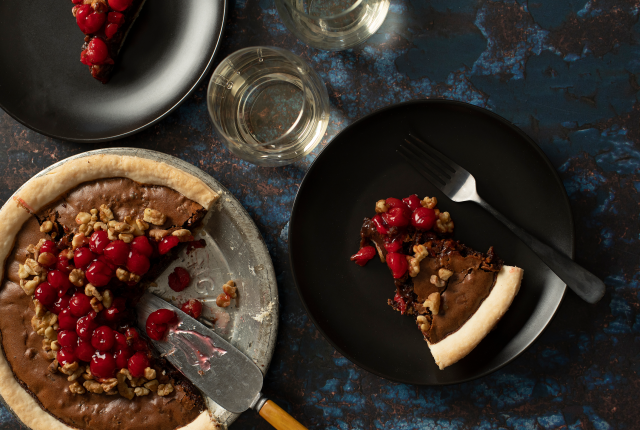
New Mexico apple pie with green chile and pine nuts.
It took a vast amount of elbow grease, but we finally had a grand opening for the Pie-O-Neer, on November 11, 1995. Just in time for Thanksgiving, Pie Town once again had pie.
About a year later, Mom encountered health problems that forced her to move to a lower elevation. I decided to make a major life change to fill some really big shoes.
Wendi Rae and I put Mom on speed dial, racked up enormous long-distance bills (this was before cell phones!), and headed into a rough transition. In a few years, we gave up on serving diner-style meals and focused solely on pie. With that, we hit our sweet spot. Crowds came, stories were written, and even a documentary film was made.
Why was pie such a powerful draw? I spent a good part of the next quarter-century trying to figure that out. I still can’t quite put my finger on it, but my special calling is talking to people, and I talked to a lot of people.
Read more: The Pie Lady hangs up her apron.
Often, I used my time with customers to discuss the “why” of pie. Most conversations contained a common thread. Pie was invariably tied to a memory. Comfort. Family. A longing for something I call “connective tissue.” Pie seems to be just that: a vehicle that can transport us to another place in time, a safe place in an ever-changing world.
Beyond that, pie just chills people out. Eating a slice of pie requires a “here and now” mentality. With each forkful, a decision must be made: Crust or filling? A bit of both? Start with the tip of the triangle or the fluted rim of crust? Whether these are voluntary or involuntary decisions is subjective.
I do know that a really good slice of pie can induce a state of bliss. At that point the maker’s intention—to compel someone to feel something—is achieved.
For the maker, the process itself can be Zen-like. Once you’ve conquered your fear of the crust (or go ahead and purchase it premade—no judgment), there’s no end to the options for fillings. What’s in season? Is it harvest time, and friends are bringing you apples from their trees, wormholes and all? Or do you just need a healthy dose of chocolate? Take advantage of any opportunity to get lost in the tactile satisfaction of using your hands to create something. This is not a beauty contest. Get it in the oven. Wait for it to cool. Share it. Everybody wins. We may never know the “why” of pie, but we can always use another slice of bliss.
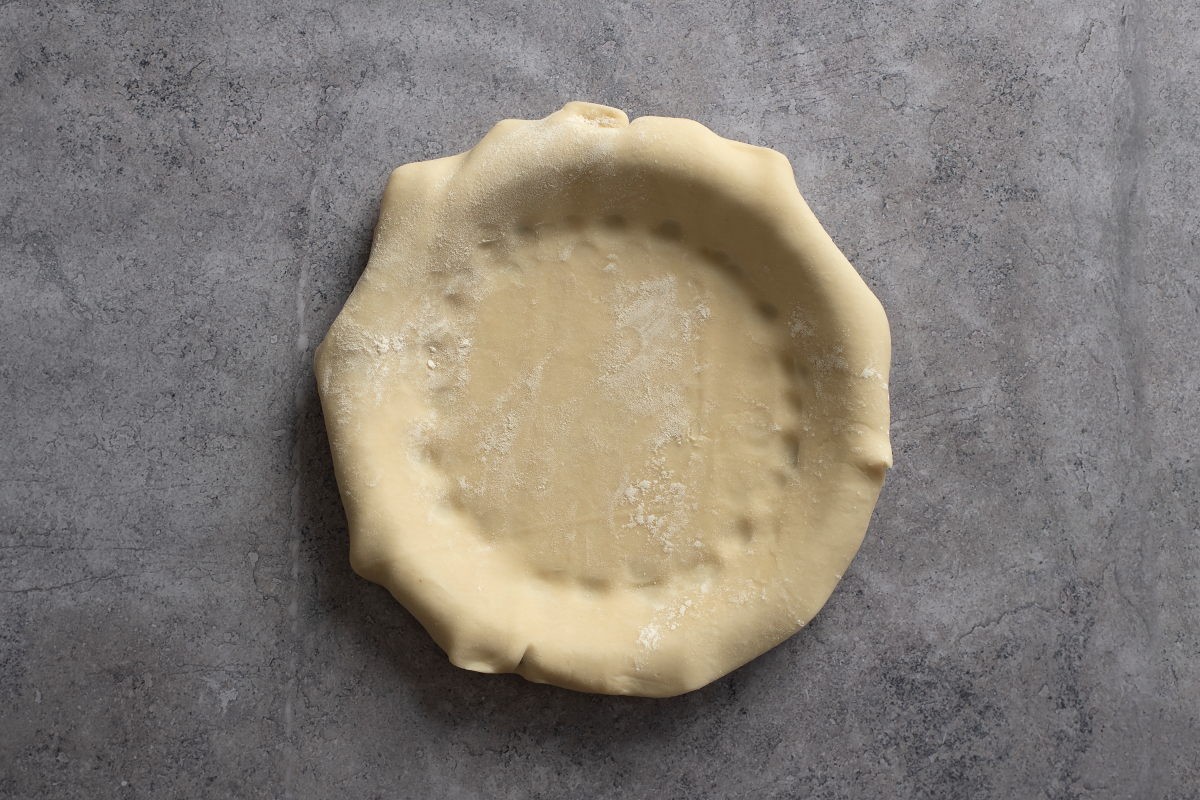
I include three recipes for crusts in Pie Town Pies, plus instructions on blind-baking crusts for custard or cream pies. This is the most basic recipe you can master. A tip: Every day, pie crust comes out differently. If the mixture seems too dry to hold the shape of a ball, add a little more water, but don’t add too much at a time. Most of all, have fun with it. This is your creation.
5 cups all-purpose flour
½ teaspoon baking powder
1 teaspoon salt
1 cup cold butter, cut into small cubes
5 ounces lard or shortening*
1 egg
1 teaspoon apple cider vinegar or
white vinegar
Ice-cold water
*You can omit the lard or shortening by increasing the butter to between 1½ and 1¾ cups.
Makes 5 Crusts
- In a large bowl, sift together flour, baking powder, and salt. Using a pastry blender, two knives, your fingers, or even a food processor (but only on the pulse setting), cut in the butter without smashing it into pieces smaller than peas, then cut in the lard or shortening until the mixture roughly resembles coarse sand, with small lumps of butter still visible.
- Break an egg into a liquid measuring cup. Add vinegar to the egg, then add ice-cold water to make one cup. Beat slightly with a fork.
- Slowly add the liquid mixture, a little at a time, to the dry ingredients, working lightly with a large fork or your hands until the dough is moist enough to hold together. Add more water if it seems too dry. Scrape the bottom of the bowl as you work, to ensure that all the flour is being incorporated.
- Without overworking the dough, take about one-fifth at a time and use your hands to gently form it into “snowballs.” Don’t compress them.
- On a lightly floured surface, gently shape balls into disks that resemble thick hamburger patties. It may take some patience to persuade the dough to stay together. Gently transfer each disk into an airtight plastic bag and chill for 20 minutes to an hour. At this point, dough disks can be rolled out for immediate use or frozen in airtight bags for later.
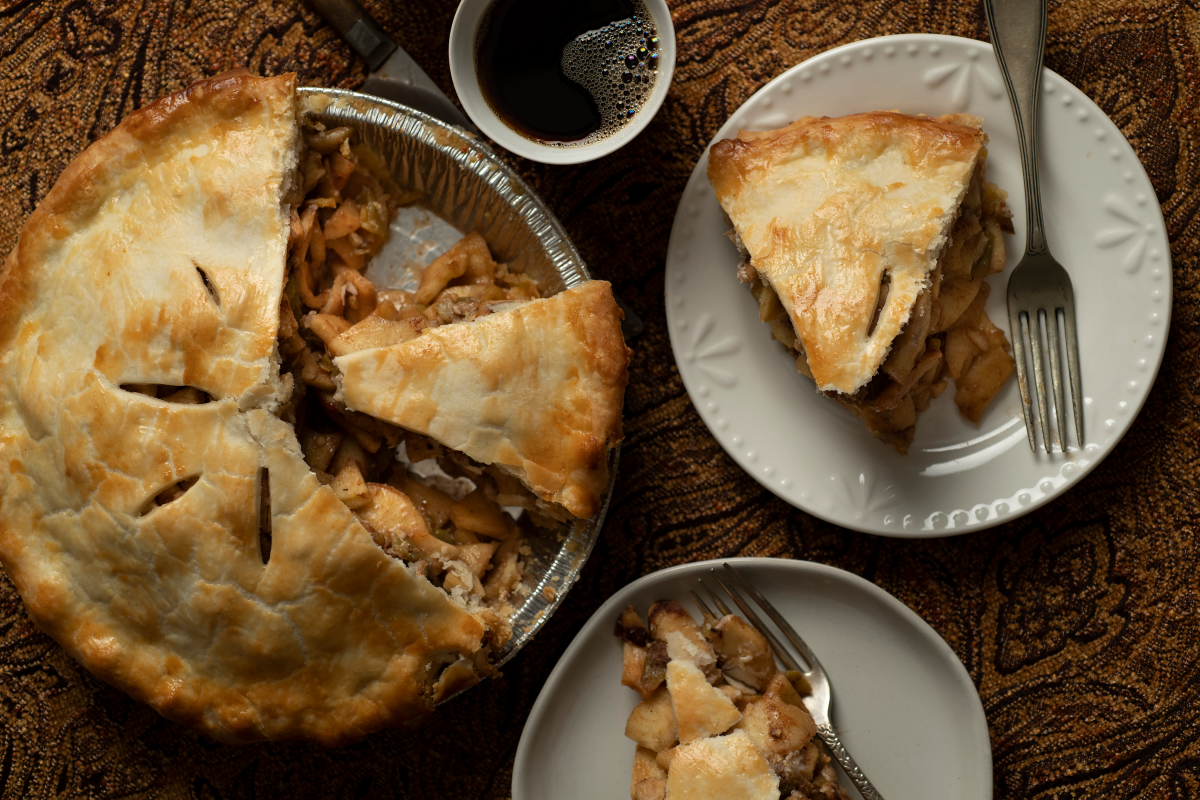
Apples, chiles, and pine nuts are indigenous to New Mexico and good for you. Chiles contain capsaicin and pack more vitamin C than oranges do. Pine nuts are rich in antioxidants and fiber. And we all know that apples keep the doctor away. Consider this pie a health food! Green chiles come in varying heat levels. Start with mild chiles, maybe mix in a few mediums, and use hot ones sparingly. A frozen “autumn roast” version will give you a nice mix of red and green chiles with medium heat. Hint: Keep some ice cream handy.
6 to 7 medium apples (any kind except Red Delicious; I like using a fifty-fifty mix of Granny Smith and either Gala or Fuji), peeled, cored, and sliced
2 tablespoons lemon juice
½ cup sugar
1 tablespoon cornstarch or tapioca starch
2 tablespoons ground cinnamon (less is fine, too)
½ cup pine nuts, toasted
½ cup green chiles, roasted, chopped, and drained (use more if they’re mild, less if they’re hot)
Pastry for a double-crust pie (see recipe)
1 tablespoon butter, cubed
1 egg white, beaten with 1 teaspoon water, for glaze
Makes 1 Pie
- Preheat oven to 425°. Splash lemon juice over apple slices in a medium bowl. Mix sugar, starch, and cinnamon in another medium bowl, then toss in the apples to coat. Mix in pine nuts and chiles.
- Fit one layer of pastry in the bottom of a pie pan, pushing it gently but snugly along the sides. Using kitchen shears or a paring knife, trim overhanging edges of crust to about an inch beyond the edge of the pie pan.
- Fill crust in pie pan with apple mixture, letting it mound in the center. Dot with butter. Using a pastry brush, glaze the outer rim of the bottom crust with the egg wash mixture. Then place the top pastry crust over the apples. Trim the outer edge of top crust to about an inch beyond the overhang. Gently press edges of the two layers together with your fingers, to make a seal all around the pie. Slightly lift the overhanging rim of the crust and tuck it under itself, so that it rides on the lip of the pie pan. Decoratively crimp the crust rim, using your fingers or a fork. Cut several ventilation slits in the top crust and glaze with egg wash.
- Place a cookie sheet or piece of aluminum foil on the bottom of the oven to catch any juices that may drip. Put the pie in the center of the oven and bake for 20 minutes. Turn temperature down to 350° and continue baking for approximately 40 to 45 more minutes, or until the top is golden brown and juices are bubbling through the slits. (If using a glass pie pan, visually check the bottom of the crust for doneness; it should be brown.) Cover the edge of the crust with a crust shield or strips of aluminum foil if it begins to burn before pie is done. Cool pie on a wire rack for one hour.
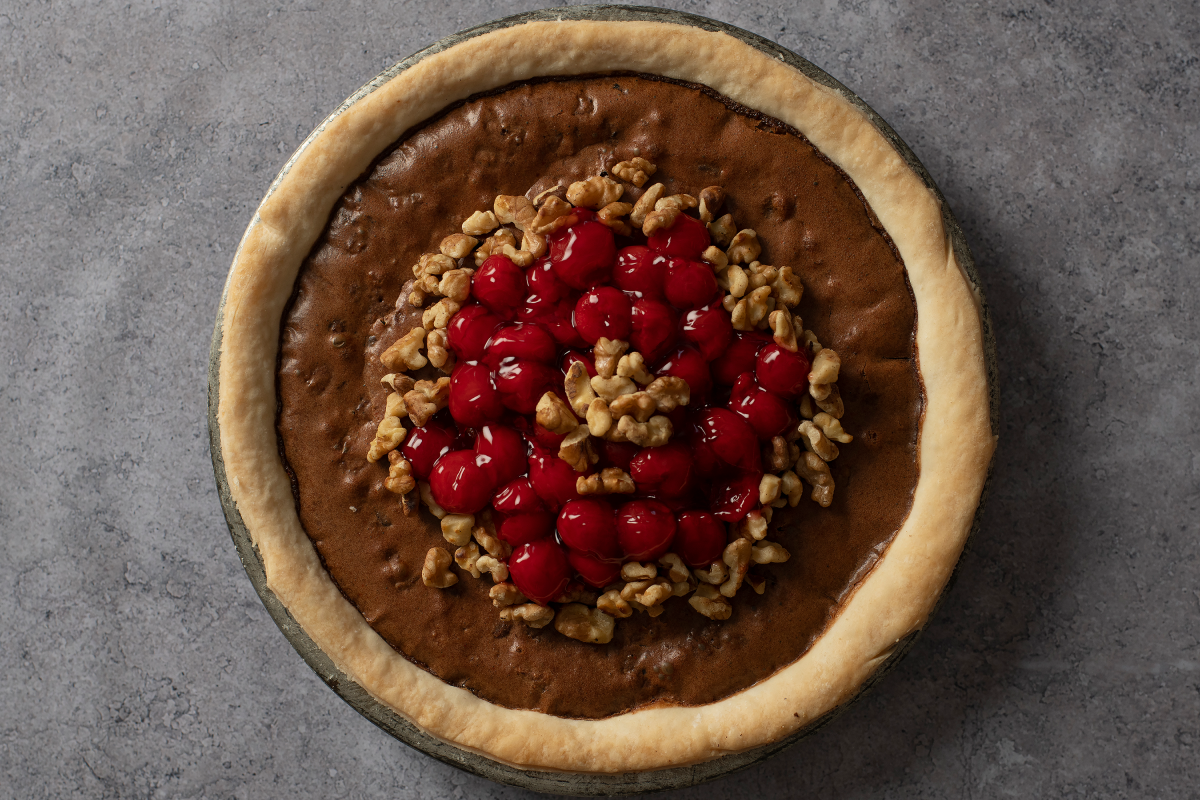
Think “fudge brownie”—with a kick! Use only pure red chile powder, not a mix that includes other spices. Start with mild chile; add hot chile for more punch. The pie filling may puff up while baking, then fall and crack when cooled. That’s okay. This recipe produces a thin pie; you may want to double the filling recipe and use most of it for a thicker pie, reserving the remainder for another use. The optional cherry topping adds sweetness and color.
One unbaked pie crust, chilled (see recipe)
½ cup butter
2 ounces semisweet chocolate bar or
60 percent cacao chocolate chips
2 eggs, lightly beaten
¾ cup light brown sugar
1 teaspoon vanilla
½ to 1 teaspoon red chile powder
¾ cup walnuts or pecans, toasted and chopped
CHERRY TOPPING
½ cup sugar
1 tablespoon cornstarch or tapioca starch
1 cup cold water
3 cups fresh or frozen pitted cherries
Makes 1 Pie
- Preheat oven to 325°. Fit the pie crust into a small pie pan (no more than 8 inches in diameter). Gently crimp overhanging crust. Set aside.
- In a small heat-proof bowl or Pyrex measuring cup, melt the butter and chocolate. The microwave or double-boiler methods both work; just make sure the mixture doesn’t boil. Using a heat-proof spatula or wooden spoon, mix well.
- In a small mixing bowl, lightly beat eggs and stir in the brown sugar, mixing until all lumps are gone. Add vanilla and red chile powder. Mix well. Stir in the melted chocolate and butter. Mix well, then use a whisk or large fork to beat for at least 1 minute, to incorporate air into mixture. It should almost double in volume.
- Cover the bottom of the unbaked pie crust with nuts, reserving a few for decoration. Using a spatula, scrape the filling into pie crust and bake approximately 35 minutes. When cool, decorate the top with remaining nuts. Serve with cherry topping (optional).
CHERRY TOPPING
- In a medium saucepan, whisk together sugar, starch, and cold water. Cook over low heat, stirring until sugar and starch are dissolved.
- Add cherries (thawed, if using frozen) and continue to cook for a few minutes, until sauce begins to thicken; you may have to use medium heat. Let cool for about 15 minutes, then spoon over top of cooled pie.
PIE, OH MY
The Pie-O-Neer is alive and well in Pie Town, open Fridays, Saturdays, and Mondays, 10 a.m. to 5 p.m., and Sundays, noon to 6 p.m. The new Pie Lady, Sarah Chavez, whips up an array of pies as well as burgers, burritos, and “Miss Mary’s Sunday Dinner,” a full meal named in honor of Kathy Knapp’s mother (and served on vintage cafeteria trays) that draws the entire town. Follow the café’s Facebook page for details on holiday pies—which are available for pickup or shipping. Contact 877-PIE-TOWN (743-8696), pioneer@pietownhomestead.com for flavors, prices, and availability.
Pie-O-Neer; 5613 US 60
575-772-2711, facebook.com/pieoneer
BOOK IT
Pie Town Pies: Making Pies with the Pie Lady of Pie Town, by Kathy Knapp, is independently published. It’s available on Amazon, but for an autographed copy, email Knapp at piepeople@gilanet.com.